- Buy VM (With minimum 4 GB Ram and 40 GB SSD for better performance)
- Follow installation steps on: MicroK8s – Get started
- Enable addon: dashboard and coredns
- microk8s enable dashboard
microk8s enable dns(Could be already enabled)
- Add alias (Could be 3rd step 😁):
- alias kubectl=”microk8s kubectl”
- It’s not permanent. To make it permanent add the alias to your shell config.
First deployment:
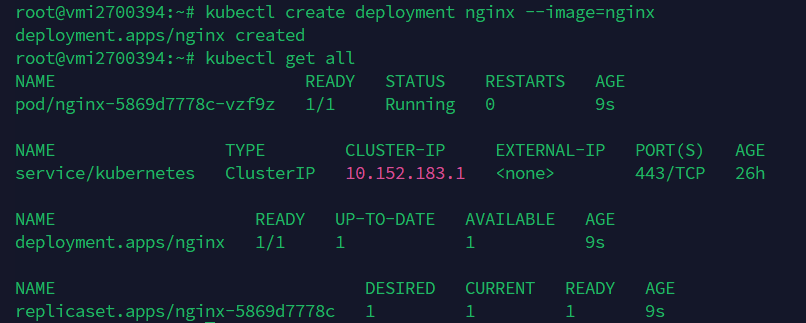
kubectl create deployment nginx --image=nginxWhat it does:
- Create a Deployment named
nginxusing the official NGINX container image - Equivalent to:
docker pull nginx - Custom version: –image=nginx:xx.xx
- Deployment object contains: 1 ReplicaSet (Multiple pods management), 1 Pod and 1 container (nginx) inside that pod.
All components before and after deployment:

Why 1 Pod should contain 1 container (1 Pod can contain multiple containers): It provides benefits like unified management, simplified deployment, and standardized resource sharing. Pods act as the smallest deployable unit in Kubernetes, offering a level of abstraction that simplifies complex applications. For smaller application you can deploy multiple containers inside a pod too.
Nginx is deployed in default config. Few commands:
kubectl get deployments
kubectl get pods
kubectl describe deployment nginx
kubectl logs <pod-name>
kubectl expose deployment nginx --port=80 --type=NodePort
Describe output
Name:                   nginx
Namespace:              default
CreationTimestamp:      Wed, 09 Jul 2025 09:26:49 +0200
Labels:                 app=nginx
Annotations:            deployment.kubernetes.io/revision: 1
Selector:               app=nginx
Replicas:               1 desired | 1 updated | 1 total | 1 available | 0 unavailable
StrategyType:           RollingUpdate
MinReadySeconds:        0
RollingUpdateStrategy:  25% max unavailable, 25% max surge
Pod Template:
  Labels:  app=nginx
  Containers:
   nginx:
    Image:         nginx
    Port:          <none>
    Host Port:     <none>
    Environment:   <none>
    Mounts:        <none>
  Volumes:         <none>
  Node-Selectors:  <none>
  Tolerations:     <none>
Conditions:
  Type           Status  Reason
  ----           ------  ------
  Available      True    MinimumReplicasAvailable
  Progressing    True    NewReplicaSetAvailable
OldReplicaSets:  <none>
NewReplicaSet:   nginx-5869d7778c (1/1 replicas created)
Events:
  Type    Reason             Age   From                   Message
  ----    ------             ----  ----                   -------
  Normal  ScalingReplicaSet  4m7s  deployment-controller  Scaled up replica set nginx-5869d7778c from 0 to 1
There are two main types when exposing:
- NodePort: Simplest for development only. It exposes the pod or deployment
- kubectl expose pod my-pod –port=80 –type=NodePort # doen’t use replica management
- kubectl expose deployment my-app –port=80 –type=NodePort
- Load balancer: Used in production, when have multiple servers. Requires cloud integration or a local load balancer like MetalLB. Provisioning is done automatically in managed kubernetes services.
Internal communication is done using cluster IP.
- kubectl expose deployment my-app –port=80 #Implicitly uses: –type=ClusterIP
- cluster IP service assigns IP to each service’s label. So, in essence each label will have IP and kube-proxy will load balance the traffic to that IP and sends to pods in service.
- Service gets the ClusterIP and routes to pods based on spec.selector
A service can span multiple deployments.
External services using type: ExternalName. It creates only CName without endpoint.
e.g.
apiVersion: v1
kind: Service
metadata:
  name: my-external-service
spec:
  type: ExternalName
  externalName: api.external.com
Example YML for service:
apiVersion: v1
kind: Service             # 🔹 It's a Service
metadata:
  name: service-a         # Name of the service
spec:
  selector:               # 🔸 This tells the service which Pods to route to
    app: deployment-a
  ports:
    - port: 80            # External service port
      targetPort: 8080    # Port inside the Pod
Example YML for deployment:
apiVersion: apps/v1
kind: Deployment          # 🔹 It's a Deployment
metadata:
  name: deployment-a
spec:
  replicas: 2             # Create 2 Pods
  selector:
    matchLabels:
      app: deployment-a   # 🔸 Must match pod labels
  template:
    metadata:
      labels:             # 🔸 Labels on the Pods
        app: deployment-a
    spec:
      containers:
        - name: my-app
          image: my-app:latest
          ports:
            - containerPort: 8080
| Feature (kind:) | Deployment | Service |
|---|---|---|
kind: | Deployment | Service |
| Purpose | Run & manage multiple pods | Expose & route traffic to pods |
| Creates | Pods (based on template) | ClusterIP (internal IP address) |
| Lifecycle Mgmt | Yes (replicas, rollout, rollback, etc.) | No (just forwards traffic) |
| Label Role | Adds labels to Pods | Uses labels to select Pods |
| Exposes to | Nothing directly | Other Pods or External traffic (via type) |
How They Work Together
- Deployment → creates Pods with label
app: deployment-a - Service → uses
selector: app: deployment-ato find those Pods - Users send requests to the Service → they are load balanced to the Pods
So, both deployment and services are management resources. Deployment manages pods lifecycle (Not directly) and service manages traffic to those pods based on cluster IP given to them based on spec label.
So, what about ReplicaSets and Deployments. What is their work?
| Feature | ReplicaSet | Deployment |
|---|---|---|
| Manages Pods | ✅ | ✅ via ReplicaSet |
| Manages Rollouts | ❌ | ✅ creates new RS for new versions |
| Rollback Support | ❌ | ✅ can revert to previous version |
| Strategy | ❌ | ✅ Rolling update, recreate, etc. |
| Used directly? | 🔸 Rarely | ✅ Common |
| Created by Deployment? | ❌ | ✅ creates and manages ReplicaSets and which in turn manages the pods |
Deployment (my-nginx)
├── ReplicaSet (nginx-1.25) ← active RS
│ ├── Pod-1
│ ├── Pod-2
│ └── Pod-3
└── ReplicaSet (nginx-1.24) ← old RS (for rollback)
Useful commands:
kubectl get deployment
kubectl get rs
kubectl describe deployment my-nginx
I think that’s all for this post. Play with the deployment.
Cheers and Peace out!!!