I know text is not easy to understand for less tech savvy people. So, I am in process of making a YouTube channel for video demonstration of tutorials.
What you would need (Requirements):
- A domain
- A PC with power backup or a laptop (Disable sleep time and lid closing behaviours)
- Good internet connection with router power backup
- The cheapest VPS server closest to your location
- A Cloudflare free account
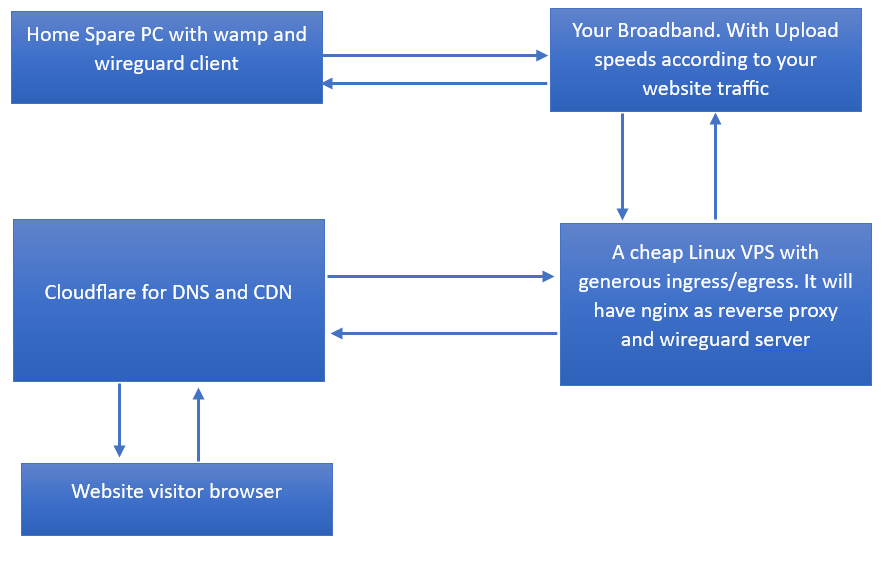
The flow of traffic would be (architecture)
Your spare computer configuration:
- Install wamp server
- Install wireguard client (For better performance you can use wiresock. It has two installre a wireguard client and a GUI) and import the config file that you will be generating in next steps
- Protect your each and every login e.g. mysql or any other DB/service with strong password.
Edit Apache server v-host configuration. The location would be something like ‘C:\wamp64\bin\apache\apache2.4.54.2\conf\extra’. You can open this file from the running wamp server context menu. Configuration e.g.
<VirtualHost *:80>
    ServerAdmin [email protected]
    DocumentRoot "C:/wamp64/www/domains/myDomainRootDirectory"
    ServerName mydomain.com
    ServerAlias www.mydomain.com
   <Directory "C:/wamp64/www/domains/myDomainRootDirectory">
       Require all granted
   </Directory>
</VirtualHost>
If you are unable to figure out above, then you should go for a service like Ngrok. It would be very easy to setup but may become costly with traffic surge.
Cheap VPS configuration
Install wireguard. Use script ‘GitHub – Nyr/wireguard-install: WireGuard road warrior installer for Ubuntu, Debian, AlmaLinux, Rocky Linux, CentOS and Fedora‘ for easy installation. If you have Linux skills, then you know how to install using the tutorial given on Wireguard official website.
Create a client config (how to is given in above script link) and copy that config to your spare pc (use cat command for contents of files and copy from ssh terminal, and create a file with same name and paste the contents to that file.)
Install Nginx:
# update system
sudo dnf clean all
sudo dnf update
sudo dnf groupinstall "Development Tools"

# install nginx
sudo dnf install nginx

# enable service
sudo systemctl restart nginx
sudo systemctl status nginx
sudo systemctl enable nginx

# open firewall (If not installed then install firewalld and enable it as we have done for nginx)
sudo firewall-cmd --permanent --add-service=http
sudo firewall-cmd --permanent --add-service=https
sudo firewall-cmd --reload

# Done
Update nginx main config file (You can also put a new config file in config.d :-)). It should look something like below:
# For more information on configuration, see:
#   * Official English Documentation: http://nginx.org/en/docs/
#   * Official Russian Documentation: http://nginx.org/ru/docs/
user nginx;
worker_processes auto;
error_log /var/log/nginx/error.log;
pid /run/nginx.pid;

# Load dynamic modules. See /usr/share/doc/nginx/README.dynamic.
include /usr/share/nginx/modules/*.conf;

events {
    worker_connections 1024;
}

# expose tcp ports on you home pc. In below example we have listening on port
#3309 in linux server to the public and fowarding requests to port 3306 on home PC
#If you face issue with stream then for now remove the stream block and continue.
# at the end of tutorial, I have added a solution
stream {
  server {
    listen 3309;
    listen [::]:3309;
    proxy_pass 10.7.0.8:3306;
  }
}

http {
    log_format  main  '$remote_addr - $remote_user [$time_local] "$request" '
                      '$status $body_bytes_sent "$http_referer" '
                      '"$http_user_agent" "$http_x_forwarded_for"';

    access_log  /var/log/nginx/access.log  main;

    sendfile            on;
    tcp_nopush          on;
    tcp_nodelay         on;
    keepalive_timeout   65;
    types_hash_max_size 4096;

    include             /etc/nginx/mime.types;
    default_type        application/octet-stream;

    # Load modular configuration files from the /etc/nginx/conf.d directory.
    # See http://nginx.org/en/docs/ngx_core_module.html#include
    # for more information.
    include /etc/nginx/conf.d/*.conf;


    server {
        listen       80;
        listen       [::]:80;
        server_name  domain.com www.domain.com;
        location / {
            # the private IP of you wireguard client.
            # you find the ip in the config file that we have generated in this tutorial

            proxy_pass http://10.1.0.1:80/;
            index  index.html index.htm index.php;
            proxy_cache_bypass                 $http_upgrade;

             # Proxy headers
             proxy_set_header Upgrade           $http_upgrade;
             proxy_set_header Connection        "upgrade";
             proxy_set_header Host              $host;
             proxy_set_header X-Real-IP         $remote_addr;
             proxy_set_header X-Forwarded-For   $proxy_add_x_forwarded_for;
             proxy_set_header X-Forwarded-Proto $scheme;
             proxy_set_header X-Forwarded-Host  $host;
             proxy_set_header X-Forwarded-Port  $server_port;

             # Proxy timeouts
             proxy_connect_timeout              60s;
             proxy_send_timeout                 60s;
             proxy_read_timeout                 60s;
            } # end location
        } # end server


    server {
        listen       443 ssl;
        listen       [::]:443 ssl;

        # Generate ssl certificates from cloudflare, after configuring DNS
        ssl_certificate /etc/nginx/certs/globalcert.pem;
        ssl_certificate_key /etc/nginx/certs/globalkey.pem;
        server_name  domain.com www.domain.com;
        location / {

            # we can forward request to port 80 because we have a tunnel and traffic will be encrypted
            proxy_pass http://10.1.0.1:80/;
            index  index.html index.htm index.php;
            proxy_cache_bypass                 $http_upgrade;

             # Proxy headers
             proxy_set_header Host              $host;
             proxy_set_header X-Real-IP         $remote_addr;
             proxy_set_header X-Forwarded-For   $proxy_add_x_forwarded_for;
             proxy_set_header X-Forwarded-Proto $scheme;
             proxy_set_header X-Forwarded-Host  $host;
             proxy_set_header X-Forwarded-Port  $server_port;

             # Proxy timeouts
             proxy_connect_timeout              60s;
             proxy_send_timeout                 60s;
             proxy_read_timeout                 60s;
            } # end location
        } # end server

}
Cloudflare config:
Add domain to Cloudflare sites and update the nameservers on your domain provider. It will take some time for DNS to update. After update add/edit the A record for your domain DNS by pointing to your cheap Linux server IP.
Issues and fixes
- Stream block in nginx causing issues: You need to install a nginx module. Use below command to install the module
yum install ngx_stream_moduleAdd stream block and Restart nginx service
systemctl restart nginxIf still facing issue keep reading 🙂
2. Port binding issue:
Open port in firewallD
firewall-cmd --zone=public --add-port=3309/tcpThis will open the port 3309 with protocol tcp in the public zone of the runtime environment. The runtime environment is only effective until the machine has been rebooted or the firewalld service has been restarted. The zone option can be omitted here if the port should be added to the default zone.
firewall-cmd --permanent --zone=public --add-port=3309/tcpIf you want to make this a permanent change also, then open the port also in the permanent environment. This means the port will be open also after a system reboot or firewalld service reload.
Allow port in SELinux (if enabled). If you don’t do it nginx will not start. You can check nginx status by using: journalctl -xeu nginx.service
semanage port -l | grep http_port_t
http_port_t                    tcp      80, 81, 443, 488, 8008, 8009, 8443, 9000
As you can see from the output above with SELinux in enforcing mode http is only allowed to bind to the listed ports. The solution is to add the ports you want to bind on to the list
semanage port -a -t http_port_t -p tcp 3309will add port 3309 to the list.
If still facing issues, then comment below
Cheers and Peace out!!!